ATLAS Downgrade and Stop Upgrades
Sometimes, the ATLAS update will break certain things in the server, which will mean that we will keep the server version back temporarily while things get fixed or the Arbiters decide on the next step for the server. This means that, if you accidentally upgrade your ATLAS install, that you will not be able to access the server. But don't worry, we have a solution! Follow these instructions to fix the issue.
Stop Upgrade
To stop ATLAS from upgrading, you need to change a setting in your ATLAS properties in Steam.
Step 1
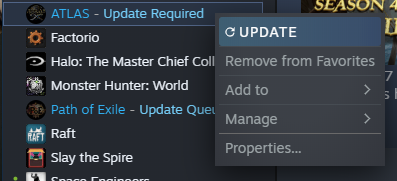
Right click on ATLAS in your Library then select Properties
Step 2
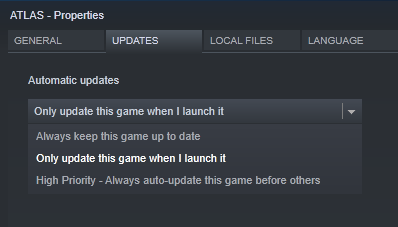
Go to the Updates tab, and change the setting to 'Only update this game when I launch it'
Step 3
Go to the Local Files tab, and click Browse Local Files...

AtlasGame.exeAtlasGame_BE.exe- ATLAS with BattleEye
Or, right click and create a desktop shortcut for your chosen one. You will need to start the game with this shortcut, instead of using the Steam Library.
(Optional) Step 4 - Low Memory Mode
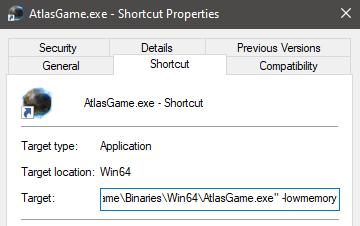
If you need to launch ATLAS in low memory mode, create a desktop shortcut, then right click the new shortcut and select properties. In the Target box, add -lowmemory at the end, then click OK
Downgrade ATLAS
To downgrade ATLAS, you will need to install a couple of pieces of software - this used to be possible through the Steam Console, but they changed something so that method doesn't work any more. (Specifically, they blocked downloading old manifests, for those interested).
These instructions assume you own ATLAS on the account you are using later on - If you do not, then this will not work. Piracy is bad, mkay?
Step 1 - .NET Core
Download and install the latest .NET Core runtime. This can be found here: Download .NET
You will want to click the "Download .NET Core Runtime" button, and then the "Download x64" button.
Step 2 - Depot Downloader
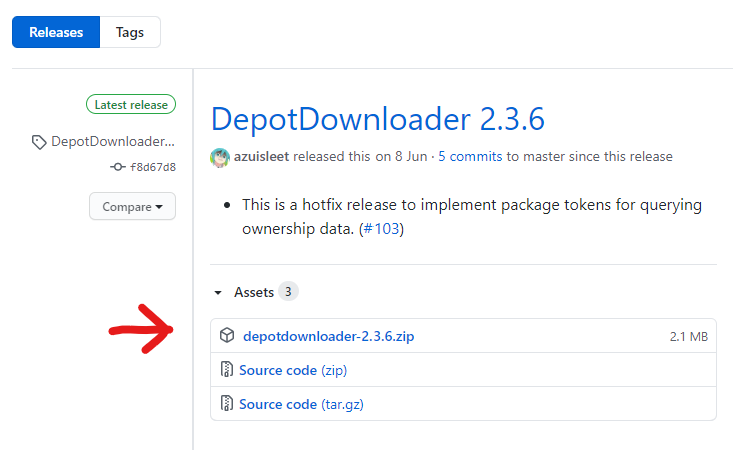
Download the latest version of the Depot Downloader here: Depot Downloader latest release
Click the zip file in the release page to download it (at time of writing, depotdownloader-2.3.6.zip):
Unzip somewhere sensible, you will need the contents of this zip file for the future steps
Make sure the disk where you unzip Depot Downloader has enough space for ATLAS as well! At time of writing, this is ~123GB
Step 3 - Opening a Shell
Now you will need a CMD window or a Powershell window open. You can open these by:
- Pressing Win+r to open the Run dialog
- Right clicking on your Start Menu Button and clicking "Run"
- Or, on Windows 10, pressing the Start Menu Button/Windows Key
Then typing cmd or powershell. This will open one or the other of those programs.
If you type dotnet then press enter, you should see some help information like so:
Usage: dotnet [options]
Usage: dotnet [path-to-application]

Options:
  -h|--help         Display help.
  --info            Display .NET Core information.
  --list-sdks       Display the installed SDKs.
  --list-runtimes   Display the installed runtimes.

path-to-application:
  The path to an application .dll file to execute.
This means that you have installed .NET Core correctly, and are in the right place!
Step 4 - Locating the Depot Downloader
Now you will need to navigate to where you unzipped the Depot Downloader using the cd command. If you unzipped it into your downloads folder, then running the following will get you to the right place:
cd Downloads\depotdownloader-2.3.6If you unzipped it anywhere else, change the folder name as needed.
Optional Step - Copy ATLAS Files
You can optionally copy your current ATLAS Game directory into the folder that Depot Downloader will use. This will work with an already updated ATLAS Game, and will speed up the downgrade.
To do this, create the folders depots\834911\5217219 inside the Depot Downloader directory, then copy the contents of your ATLAS game folder into there. This means that, you have the ShooterGame, Engine, and Tools folders inside depots\834911\5217219.
Step 5 - Downloading ATLAS
The final step here is to download ATLAS! You will need your Steam Username, Password, and if you use it, your 2FA to perform this step.
Run the following command, swapping MyUsername with your own steam Username.
dotnet DepotDownloader.dll -app 834910 -depot 834911 -manifest 2520647299836549642 -username MyUsername -remember-passwordYou will be asked for your password, so enter it where it says (no characters will appear as you type, so be careful!) And if you have 2FA enabled you will then be prompted for your 2FA code.
After that, it will start downloading the files! Now you wait...
Step 6 - Play ATLAS
Now you can play ATLAS again! You will find the files in depots\834911\5217219, and can launch the game using one of the following executables:
ShooterGame\Binaries\Win64\AtlasGame.exeShooterGame\Binaries\Win64\AtlasGame_BE.exe- With BattleEye
You can also add this to your Steam library as a non-steam game if you want to.
Paintings and Saved Character Settings
Note that as this is a different installation, you will not have any of your saved paints or character setups - you will need to copy those from your main ATLAS installation to retrieve those. These can be found in your old installation at:
ShooterGame\Saved\MyPaintings- PaintingsShooterGame\Saved\SavedAtlasLocal- Character Settings (for new Characters)ShooterGame\Saved\NewMapImageCache- Map images